Amcrest cloud allows you to connect your IP camera to a cloud-based service that allows you to store and access recorded events from a secure location from anywhere in the world. For more information on cloud setup as well as plans, we offer please follow the instructions provided below.
For more information about continuous cloud plans and pricing click here.
For more information on how to set up and add a camera to the Amcrest Cloud using a desktop or laptop, click here.
Once you have created an Amcrest Cloud account you will be able to sign in to your account via the Amcrest Cloud website on a laptop or PC. The website can be accessed at amcrestcloud.com
Note: The Amcrest Cloud website can be accessed using either Google Chrome, Firefox, Safari, or Microsoft Edge.
When you have successfully logged into your cloud account you will see the following menu:
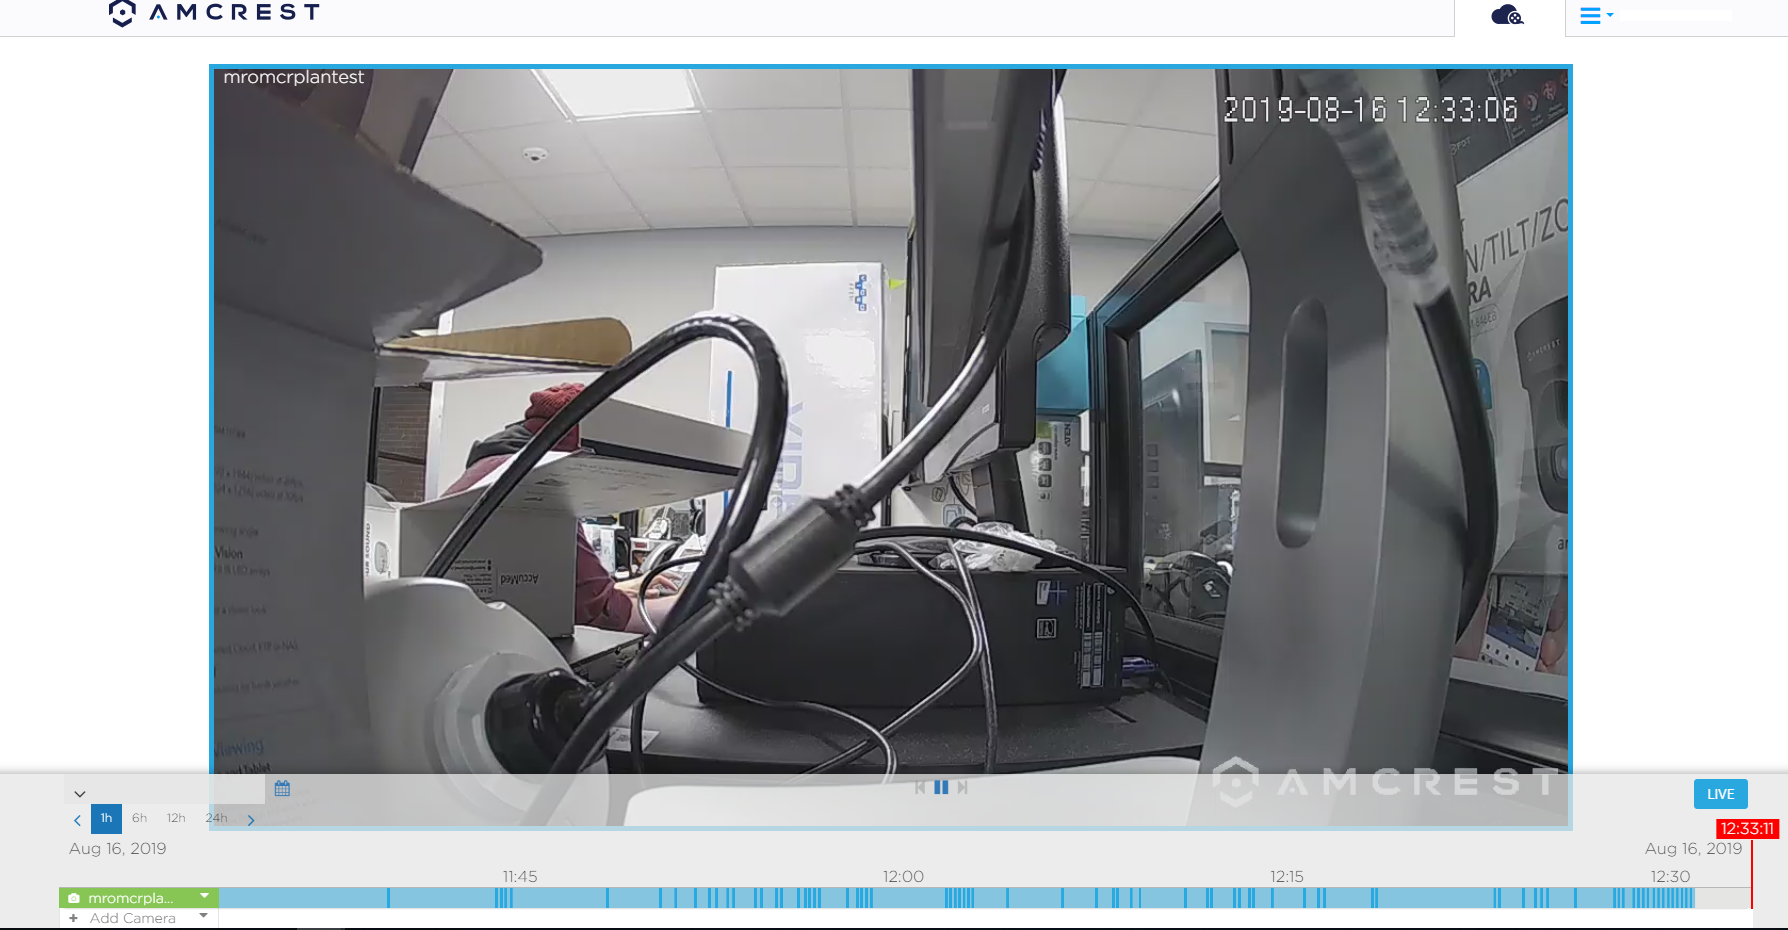
Motion recordings will be the darker blue areas on the time line and the lighter blue areas will be the continuous recordings.
Below is an explanation of each feature listed on the user interface for the Amcrest Cloud via a laptop or PC:
![]() Use the Live button to access the live stream of a connected camera from the cloud.
Use the Live button to access the live stream of a connected camera from the cloud.
 The Next button is used to play the next recording stored in the cloud. The Pause button will pause the live feed from the camera. To return back to play the stream, press the Play button or click GO LIVE. The Previous button is used to play the previous recording store in the cloud.
![]() Use the Calendar button to navigate to a specific date and time of a stored event. If you would like to save media for a longer period of time you can upgrade your storage plan. For more information on how to upgrade your cloud storage plan click here.
Use the Calendar button to navigate to a specific date and time of a stored event. If you would like to save media for a longer period of time you can upgrade your storage plan. For more information on how to upgrade your cloud storage plan click here.
![]() Use this option to easily navigate the timeline bar to access events for a specific date from 1, 6, 12, and 24-hour increments.
Use this option to easily navigate the timeline bar to access events for a specific date from 1, 6, 12, and 24-hour increments.
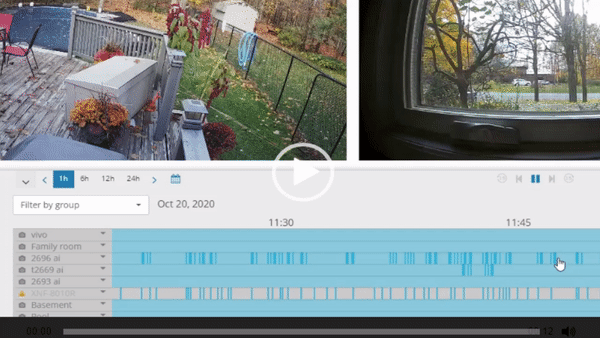
![]() Use the Timeline bar to scroll through recordings retained on the cloud. In the timeline for continuous recording, you will notice different colored sections. For a brief description of what these mean refer to the information below.
Use the Timeline bar to scroll through recordings retained on the cloud. In the timeline for continuous recording, you will notice different colored sections. For a brief description of what these mean refer to the information below.
Light Blue: Continuous recordings stored on the cloud.
Dark Blue: Motion events that were captured by the camera.
Gray: Any gray areas are represented by either a disconnect of the camera or disruption of service.
 Use this menu to access additional features for your camera. To access this menu, click on the small triangle icon to access the following menu:

The features in this menu include:
- Edit: Allows the user to access specific settings related to their connected device. These features include:
- Camera Name: This allows the user to modify the name of the selected camera.
- Recording Mode: This allows the user to switch between Continuous and Motion Detection only recordings. You can turn recordings off as well in this menu.
- Event Triggers Schedule: This allows the user to access motion detection trigger settings for their device. This setting will always be set to the Always On position since the cloud will always store events based on motion detection.
- Resolution: Allows the user to set resolution quality in the app. Currently, the max resolution for Amcrest Cloud is 4MP.
- Notifications: This allows the user to set which notifications they would like to receive from the app. This includes both motion detection and camera health checks.
- Image Appearance: This allows the user to flip, mirror or flip/mirror the camera's image. This is useful if the user has already mounted a camera and would like to flip/mirror the feed.
- IR Mode: This allows the user to set the IR functions for their camera. This can be set to Auto of night vision, or Off to turn the IR lights off completely. Please note, if you turn off the IR lights on your camera, night vision will not work properly.
- On-Screen Display: This toggle switch allows the user to turn on or off the display on the live view screen.
- Camera OSD Timezone: This allows the user to adjust the time zone for the camera if necessary.
- Camera Username: This allows the user to modify the username for their camera.
- Camera Password: This allows the user to modify the password for their camera.
- Test Connection: This allows the user to test the overall connectivity of the camera to the cloud.
- Reconfigure Connection: This allows the user to automatically reconfigure the camera connection from the camera to the cloud server.
After editing your camera settings, click on the Save icon to save and apply the settings to your camera. If you do not wish to proceed with these settings, click Cancel.
- Wi-Fi: This allows the user to adjust or set Wi-Fi settings for their camera. This is only applicable to certain model cameras that have Wi-Fi capabilities.
To use this feature, click on the Scan button to allow the camera to scan for your Wi-Fi network. Select your Wi-Fi network from the list to load the SSID into the SSID field.
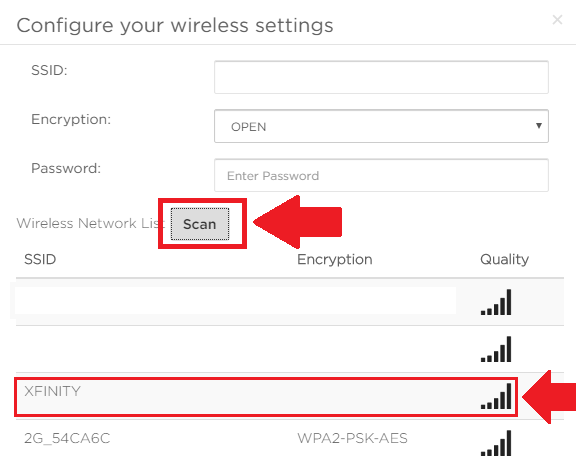
Once the SSID and encryption have been automatically inserted into their respective fields, enter the password for your Wi-Fi network and click on the Save button at the bottom of the menu to save it to your camera.

- Pop-out: This allows the user quick access to their live view screen. When activated, the live view screen will populate in a separate, smaller window.
In the pop-out menu, you will notice a few additional icons. These icons are associated with the frame view of the live feed:

Below is an explanation of each of the following items in this menu:
![]() Used to turn the audio on and off on the camera.
Used to turn the audio on and off on the camera.
![]() Used to minimize the pop-out menu.
Used to minimize the pop-out menu.
![]() Used to set the pop-out window to full screen.
Used to set the pop-out window to full screen.
![]() Used to exit the pop-out window.
Used to exit the pop-out window.
- Time Lapse: This allows the user to generate a time-lapse video for a specific start and end date. The time-lapse video can be between 10 seconds - 5 min. For more information on the time-lapse video, click here.
- Download: This allows the user to download events from the timeline bar. Once selected, the timeline bar will display a red bar indicating the events are ready to download. Since continuous recording is enabled, each event downloaded will be in 1-hour increments.
![]()
To download, click on the ![]() download button. When selected, a download link will be available on the settings page. This download link will be available for 24 hours. After that time another download link will need to be generated. If you do not wish to download an event, click the X button to exit the download option.
download button. When selected, a download link will be available on the settings page. This download link will be available for 24 hours. After that time another download link will need to be generated. If you do not wish to download an event, click the X button to exit the download option.
Please note, motion detection recordings can be downloaded using the Timeline bar. To download an event from the timeline, hover your mouse over the event and click "Download this event".
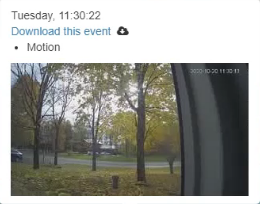
Please note, if you hover your mouse over the event in the timeline, you will be able to preview the event as well before you download it.
Click on the cloud download icon (  ) a download link of the event will be generated and available in the settings menu under Downloads. Click on Download to download the event to your computer.
- Delete: This allows the user to Delete the Camera from the cloud. WARNING: Deleting a camera from the cloud will permanently delete all media associated with the camera from the cloud. To delete the camera, click on the Delete button. To cancel, click the Cancel button.
Add Camera: This allows the user to add an additional camera to their cloud account. For more information on adding additional cameras to the cloud click here.
If you hover your mouse pointer over the live view screen you will notice an additional menu bar begin displayed. This menu bar allows you to access the following settings:

Below is an explanation of the following items in this menu:
![]() Used to turn the audio on and off on the camera.
Used to turn the audio on and off on the camera.
![]() Used to minimize the pop-out menu.
Used to minimize the pop-out menu.
![]() Used to set the pop-out window to full screen.
Used to set the pop-out window to full screen.
![]() Used to access additional menu settings such as Motion Detection, Pan and Tilt, and Image Settings.
Used to access additional menu settings such as Motion Detection, Pan and Tilt, and Image Settings.
- Motion Detection: This allows the user to set motion detection regions for the camera within the app. This option also allows the user to set the Sensitivity and Threshold of the motion detection settings. For more information on adjusting motion detection settings, click here.
 Use the X button to exit out of the Motion Detection settings menu.
- Pan and Tilt: This allows the user to adjust pan and tilt settings for their camera. This is only applicable for cameras with PTZ functionality such as the IP2M-841B and the IP4M-1041W for example. Below is a screenshot of the Pan and Tilt menu:
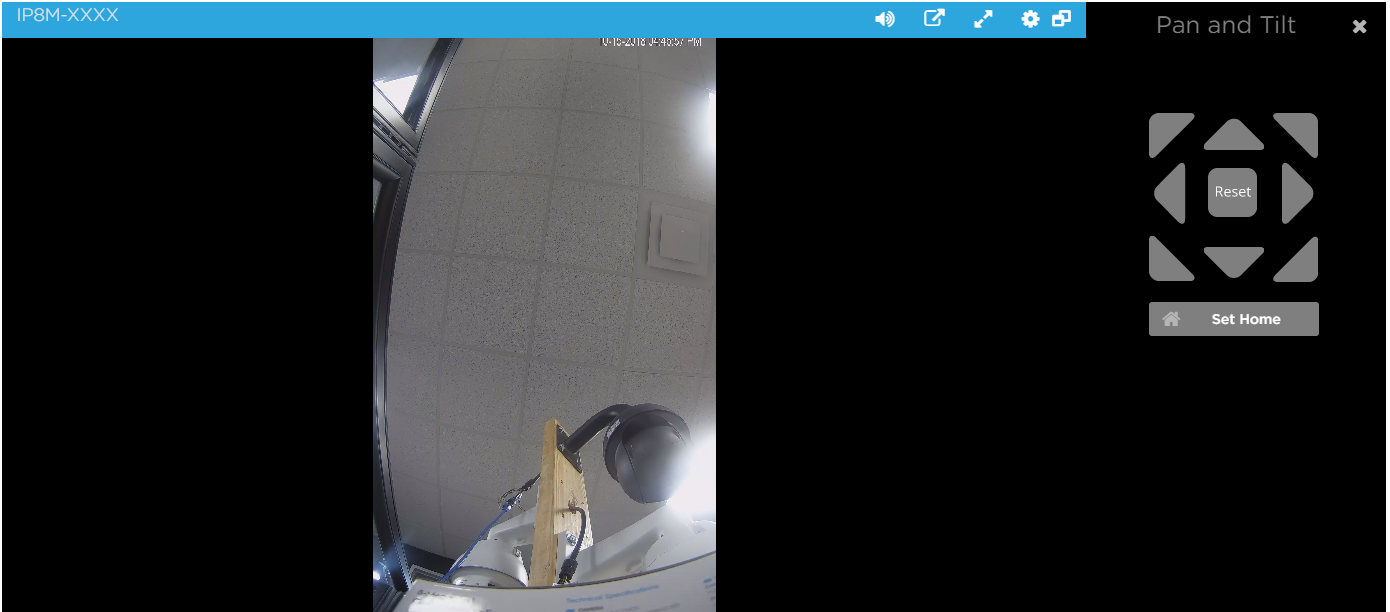
Use the Pan and Tilt directional arrows to begin panning and tilting your camera. To reset the settings, click on Reset. To reset the camera to its original (home) position, click on Set Home. To exit the pan and tilt menu, click on the X button.
Image Settings: This allows the user to adjust the brightness, contrast, saturation, and sharpness of the image from the camera. To save the modified information to your camera. Below is a screenshot of the Image Settings menu:
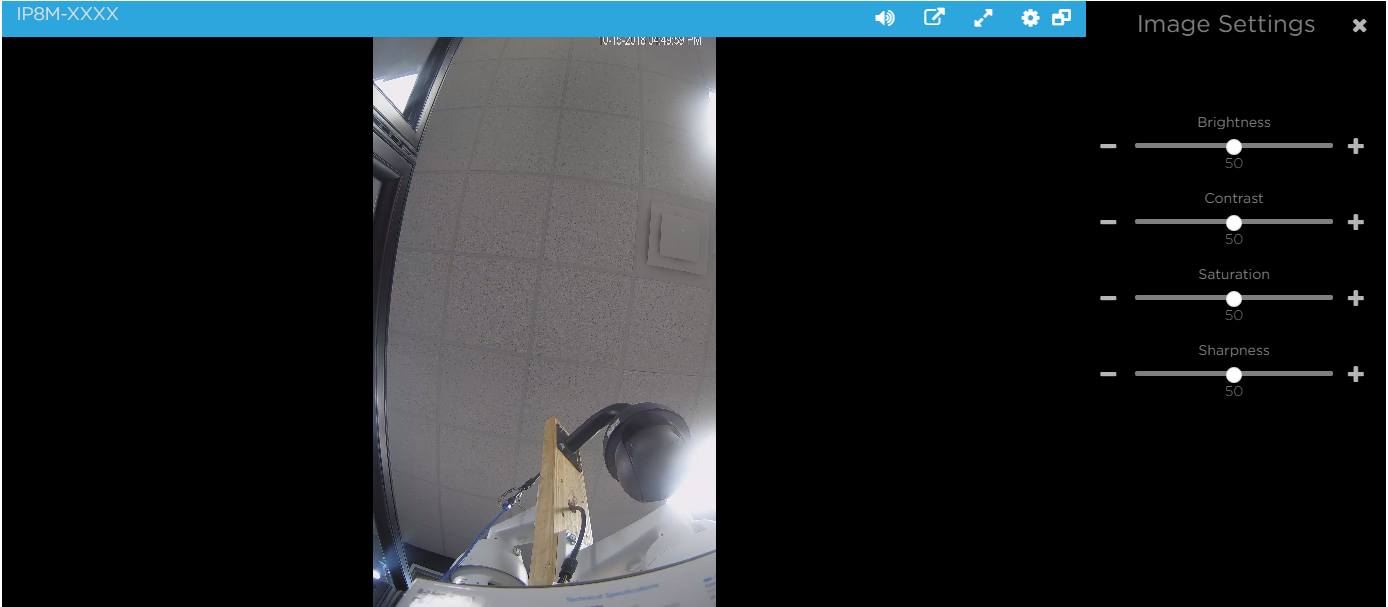
Use the sliders in this menu to adjust the image settings. To exit this menu, click on the X icon.
 Use this icon to refresh the live view screen.
 Use this icon to access additional menu settings for your cloud account.

Below is an explanation of the items listed in this menu:
- Upgrade: Use this menu as a quick reference point when upgrading your cloud plan. This option features all current cloud plans and the options to upgrade your cloud account.
- Schedules: The schedules menu provides a direct link to the Settings menu.
- Settings: Use this menu as a quick reference point when upgrading your cloud plan. This option features all current cloud plans and the options to upgrade your cloud account.
- Notifications: This menu allows the user to add an email address. This will be the email address all of your notifications will be sent.
- Event Schedule: This menu allows the user to add a modified event schedule for the camera. To create a schedule, click on the Add Schedule icon.
- Step 1: Give the schedule a name
- Step 2: Select the camera you would like to set the schedule to from the drop-down menu.
- Step 3: Select the dates and times you would like the schedule to apply. Click YES in the All Day field if you would like the notifications to be turned on all day.
- Step 4: Click Save to save the schedule to your camera. You can also add multiple schedules by clicking on Add New Entry.
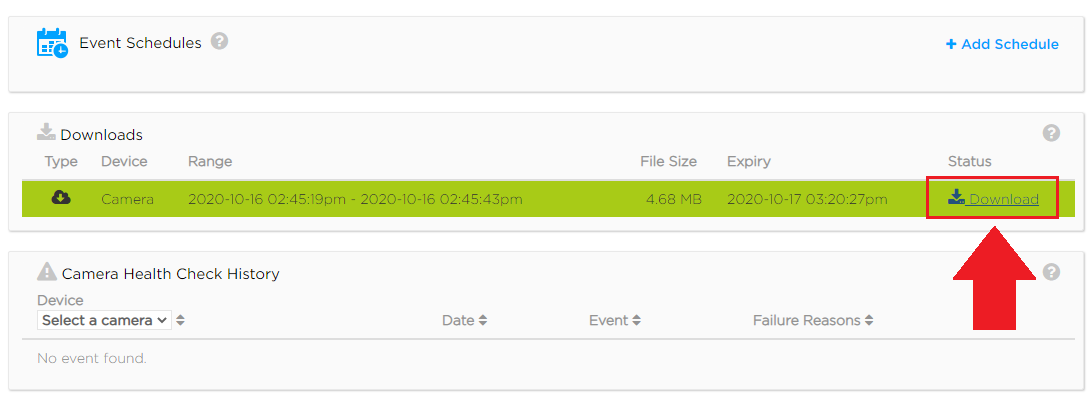
- Downloads: Use this menu to access bulk media downloads. The download archives will be retained in the cloud for 24 hours. Click on the cloud download icon (
 ) located in the Status bar to download any retained videos.
 - Camera Health Check History: Use this menu to view camera health check history. This is the history of Camera Health Check alerts generated for your cameras. The user can filter by camera and date to quickly see the history of any camera connectivity issues.
- Edit Profile: Use this menu to modify your Amcrest Cloud account profile. This includes the username and password for your cloud account, email address, and time zone. Click Submit to save and apply the changes to your cloud account profile. If you wish to exit this menu, click on Cancel.
- Add Camera: This allows the user to add an additional camera to their cloud account. For more information on adding additional cameras to the cloud click here.
- Turn Events Off: Use this option to turn off all events for all connected devices on your cloud account.
- Sign Out: Use this option to sign out of your Amcrest Cloud account.
Comments
Please sign in to leave a comment.