The Amcrest Cloud offers several ways to add your third party camera, such as a Hikvision camera to your cloud account. These methods include; the plug and play method, which is completely automated and highly recommended if you have a supported camera or using port forwarding auto setup, which uses port forwarding to add your camera to the cloud. For more information on how to setup a Hikvision camera in the Amcrest Cloud please refer to the information provided below.
Plug and Play Setup
This method is only applicable to Hikvision's Acusense line of cameras as it is the only type that are supported. Please note, you must be running the Hikvision OpenSDK firmware: v5.5.150_OP_210201
Step 1: Access your Hikvision camera in a web browser and click on Open Platform. Click Browse to locate the .app file and click Import to install the app file to the system.
Step 2: Click the toggle switch in the Operation field in the Applications list to run the app file. It will ask for permissions, do not select any permissions, click on to run the file.
Step 3: Click on Camcloud App for Hikvision and select Go to Camcloud.com, click OK to proceed.
Step 4: Select Hikvision, enter the camera's information such as the username/password, serial number, and MAC address and in the Network tab, ensure the Open SDK toggle switch is enabled. Click Next.
Note: You can find the serial number by accessing System -> System Settings, the MAC address can be found in the Network -> Basic Settings menu. Edit any settings in the settings tab and click Finish to complete the process.
Auto Setup With Port Forwarding.
Before starting this process please make sure the device you are using has been properly port forwarded on your network.
Step 1: Access your Camcloud account and click Add a Camera.
Step 2: Select Hikvision from the provided dropdown list and click Next to continue.
Step 3: Enter the camera's username/password, External IP address, RTSP port, and HTTP port. This means the RTSP & HTTP ports need to be forwarded on your router. Make sure to use an "admin" user as operator levels typically do not have have access. Click Next.
Step 4: Edit any settings in the settings tab and click Finish to complete the process.
Troubleshooting
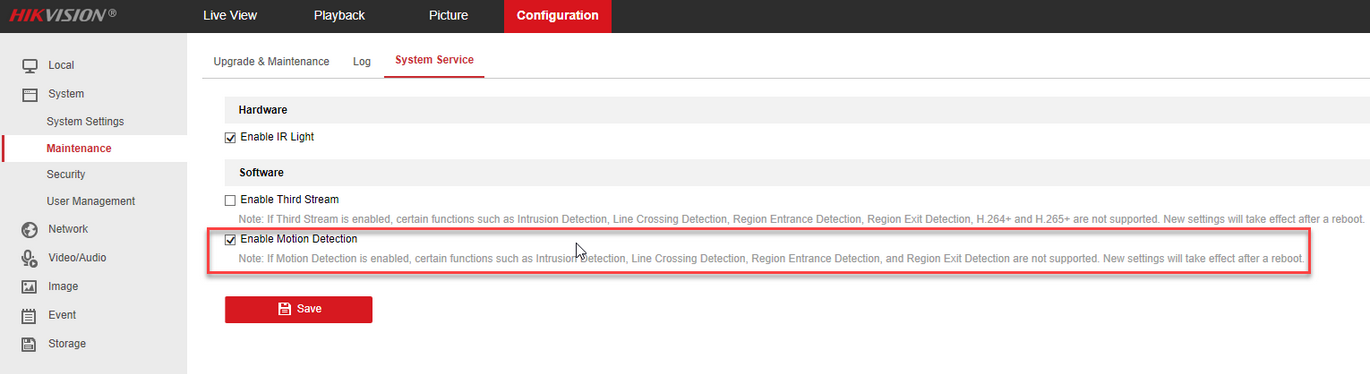
1. I'm not getting motion events
Newer cameras/firmware have an additional option for motion detection, make sure the following is enabled:
Additionally make sure to check out this guide.
2. I'm getting "No preview" or any image on my mobile device. Camera page.
Answer: New firmware versions turn off the Hikvision CGI. You can turn that back on at: Network -> Advanced Settings -> Integration Protocol
3. Camera limit reached
Answer #1: This is a misleading error. Make sure to use an "admin" user when you add a camera. The "operator" level typically doesn't have access.
Answer #2: This is a misleading error on the last step of adding the camera. This means that it's getting stuck writing the motion detection settings. Take a look at the "Event" menu in the Hikvision camera interface. It should have a Basic and Expert mode. We try to write to the Expert mode, but if that's missing then you get this failure message.
4. I'm getting a black screen for live view. Make sure the h.264 codec is selected, h.265 isn't currently widely supported.
Comments
Please sign in to leave a comment.