The Amcrest View Pro app allows instant access to all live camera streams from any location. This is the primary application most users prefer when using Amcrest systems. The app supports a multitude of features and includes both a plug-and-play setup as well as a manual network setup.
Note: AI features provided by the NVR can only be modified locally or by using the NVR's web UI via a web browser and cannot be adjusted using the Amcrest View Pro app.
The Amcrest View Pro app can be downloaded from both the App Store and Play Store.
Before the NVR can be accessed through the app using the easy plug-and-play method (P2P Setup), P2P must be enabled on the NVR.
Enabling P2P
P2P should be enabled on your device by default, however, to check if P2P is enabled, please follow the information provided below.
Log into your NVR and access the Main Menu.
In the Management section, click on Network then click on P2P. Ensure the Enable checkbox is enabled and the P2P status says “Online”. This indicates the P2P option is enabled. Use the QR code provided in the interface to add the NVR to the Amcrest View Pro app.
Amcrest View Pro Setup
The following steps will continue the app setup process for an Android phone and, though the iPhone version of the app has slightly different steps, most of this process is identical and easy.
Download and install the Amcrest View Pro app for the App Store or Google Play Store.
Adding the NVR
Open the app on your mobile device and allow the app to load.
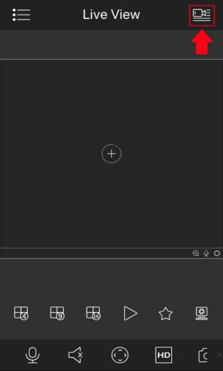
Step 1: Tap the icon in the top-right to get to the Device List.
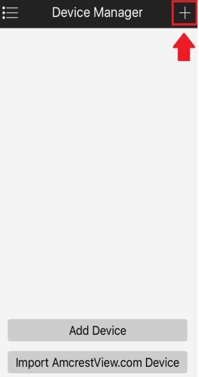
Step 2: Tap the icon in the top-right to get to the Device List.
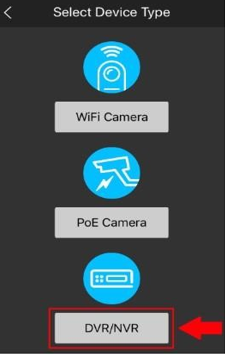
Step 3: Select your device type. In this case, we will select ‘DVR/NVR’.
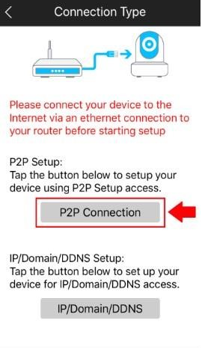
Step 4: Tap on P2P Connection to establish a P2P connection.
Step 5: Scan the QR code for the unit.
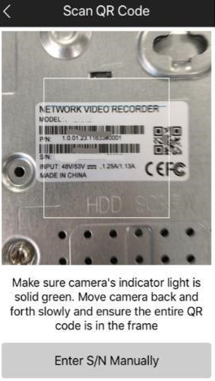
Note: To locate the serial number, you must either have physical access to the NVR or computer access to the web interface to access the P2P menu. The SN QR code will be the serial number for your device.
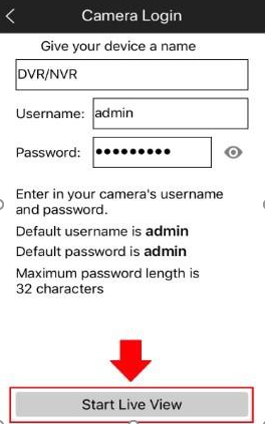
Step 6: Once the data is scanned or entered you will be taken to a camera login screen. In this menu, you can create a name for your device. Also, enter in the username and password associated with your device.
Note: If this is your first time setting up your camera, the default password will be admin. Tap Start Live View to complete the process.
Comments
Please sign in to leave a comment.