How To Setup Email Alerts (DVR)
Setting up email alerts for your DVR will allow you to receive motion detection alerts straight to your email address. To set up email alerts using your DVR, please refer to the information provided below.
Setting Up Email Alerts Directly
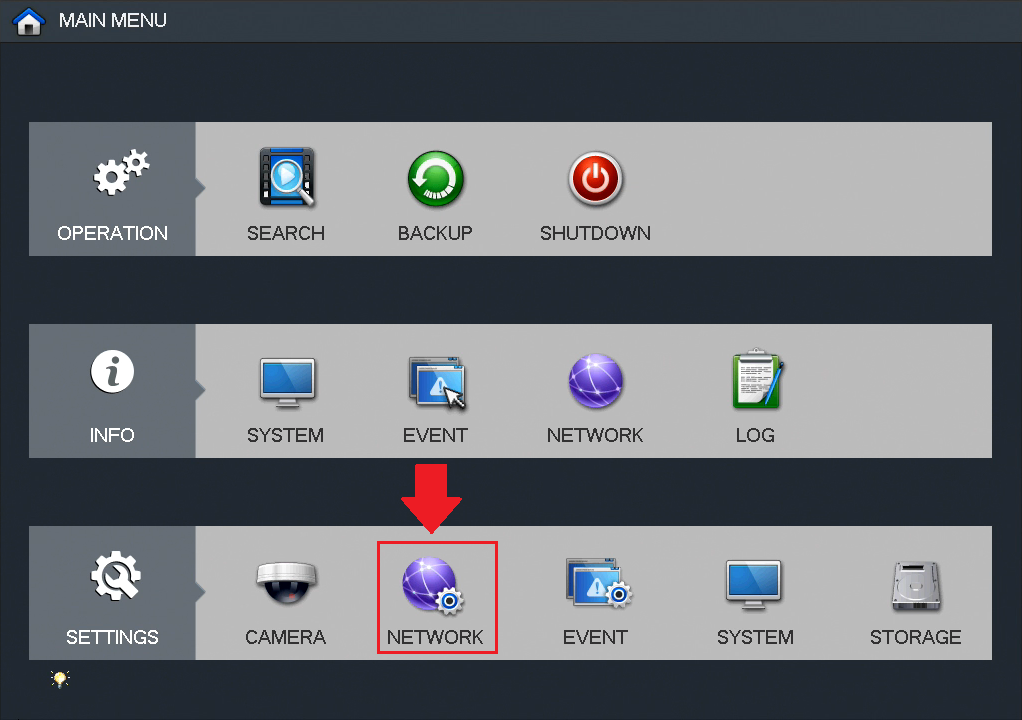
If you have direct access to your DVR and would like to set up email alerts, log into your device, and in the Settings menu click on Network.
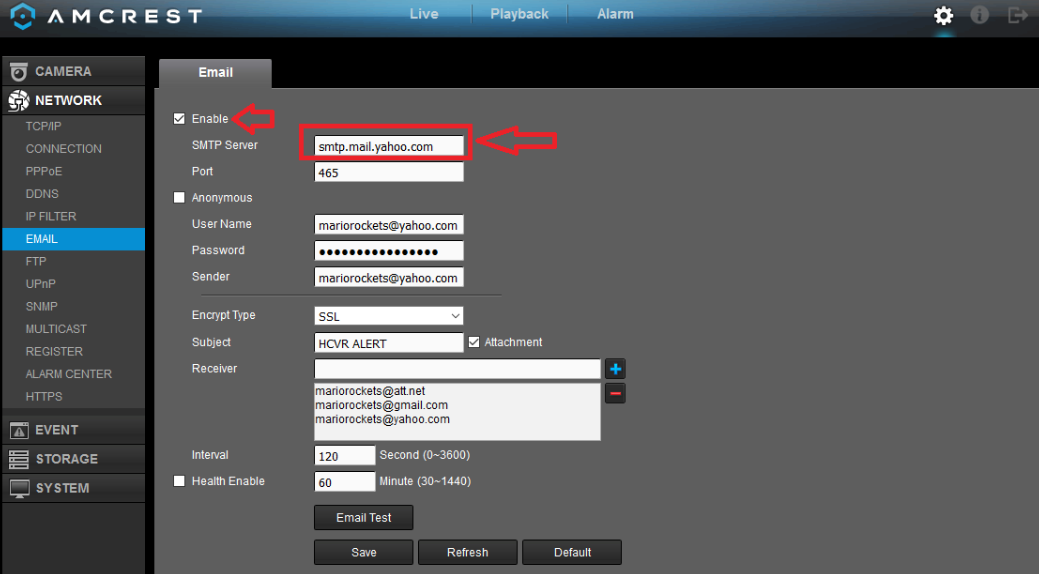
In the network menu, click on the Email tab. Make sure to click on the Enable checkbox to enable email alerts to be sent.
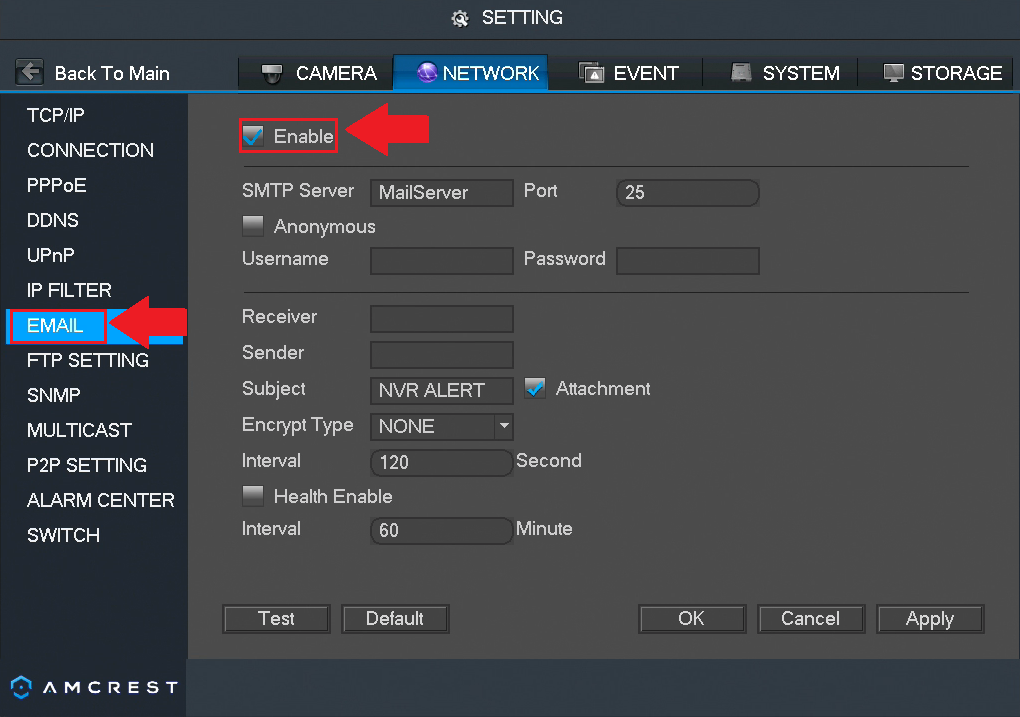
Type in the SMTP server for your email service provider in the SMTP Server field. Then, enter the port number for your SMTP server in the Port field. For more information on which email SMTP servers, port numbers, and encryption types to use, refer to the provided table below.
Popular Email Servers, Ports, and Encryption
| SMTP Server | Port | Encryption Type |
|
Gmail smtp.gmail.com |
465 587 |
SSL TLS |
|
Microsoft Live & Hotmail smtp.live.com |
587 | TLS |
|
Comcast/Xfinity smtp.comcast.new |
465 | SSL |
|
AOL Mail smtp.aol.com |
587 | TLS |
|
Charter Communications mobile.charter.net |
587 |
TLS |
|
AT&T smtp.mail.att.net |
465 |
SSL |
Once this information has been filled out, enter the email address being used into the Username field. Enter the password for that email address into the Password field. As a general rule of thumb, always verify if your Email Address and password were entered correctly before proceeding.
Next, enter the receiver's email address into the Receiver field, this will be the email address that the alerts will be emailed. Enter the sender's email address into the Sender field. This will be the email address the alerts are being sent from.
In the Subject line, you can leave the subject as default or you can change the subject line to whatever you would like it to say. If you are sending attachments, such as snapshots, make sure to leave the checkbox for Attachment as enabled.
Select which encryption type is applicable for your SMTP Server from the dropdown menu. For example, if you are using Gmail, you can select TLS if you are using port 587. For more information on the other related options in this menu, refer to the information provided below.
Interval: This field allows the user to define, in seconds, how many events can be triggered concurrently.
- Health Enable: This checkbox allows the user to enable the function that causes the system to send out a test email to ensure if the connection is OK or not.
- Interval: This field allows the user to define, in minutes, how often emails can be sent by the system. This helps to curb heavy load on the email server when multiple events are occurring.
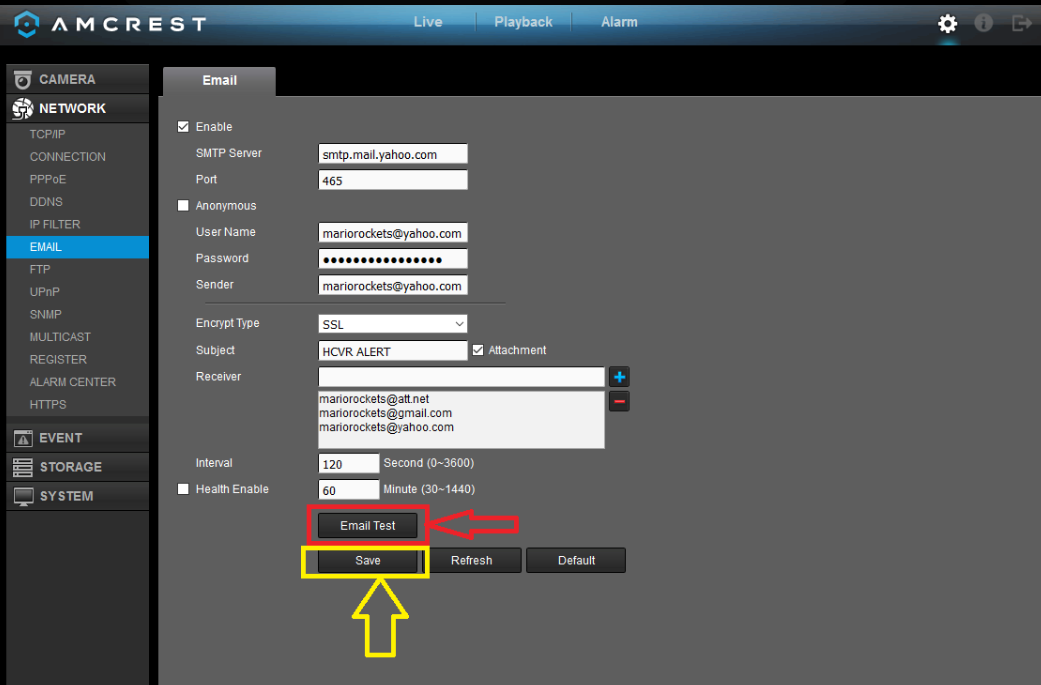
When all information for email alerts has been entered into the interface, click on Apply and then click on Save. This will save your email settings to the DVR. Once it has been properly saved, click on the Test button to test the connection. The email test should be successful.
If you are experiencing issues with emails not being sent, we recommend verifying if any firewalls/router/modem settings may be blocking the service.
For example, PFsense, which is a common open-source third-party firewall program, has the rule to block all internet communication with all IP cameras to ensure they do not phone home. This rule being active can cause the camera not to send emails.
2-Step Verification FAQ Gmail
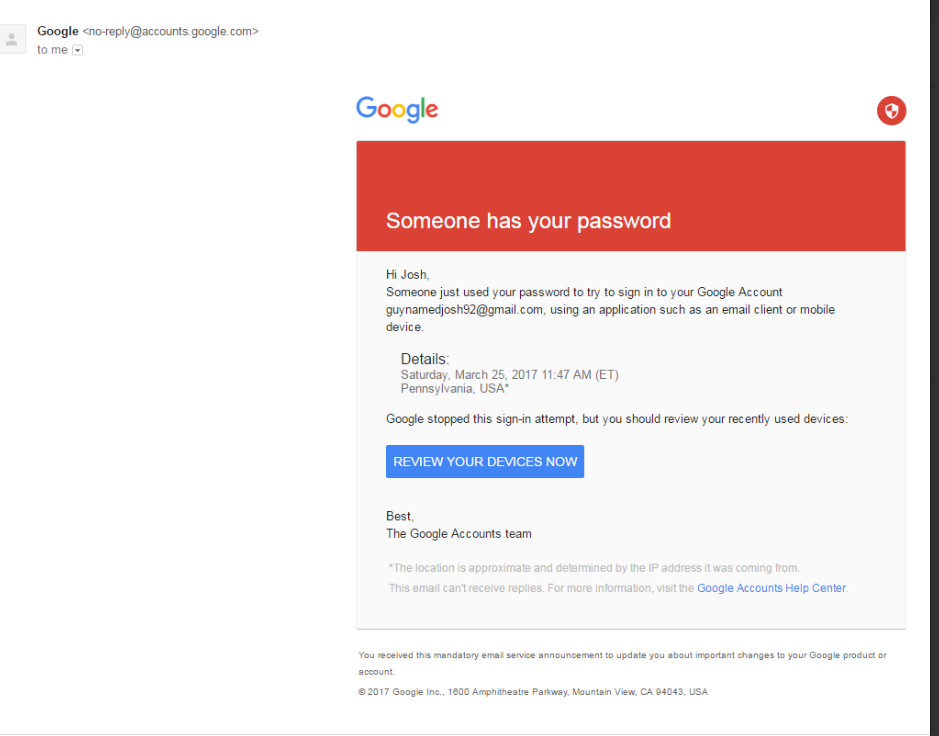
If you are still having trouble receiving email alerts from your DVR you may have "2-Step Verification" enabled or "Allow Less Secure Apps" disabled on your email account inhibiting access to your email account. To fix the issue, follow the steps provided below.
Login to your Gmail account and view your inbox open. In a new tab, go to "https://myaccount.google.com/
Scroll down and find "2-Step Verification" under "Signing in to Google" to "Password & sign-in method" and click the arrow and disable it.
Scroll further down and find "Allow Less Secure Apps" under "Connected Apps and Sites", be sure to turn this feature on.
Once this has been completed, go back to the Email tab on your DVR and click on Test to retest the email connection.
Note: Gmail may initially block the attempt and it may take up to 1 hour to receive the email from them to allow the customer to give permission to the device.
How To Enable Email Alert Snapshots
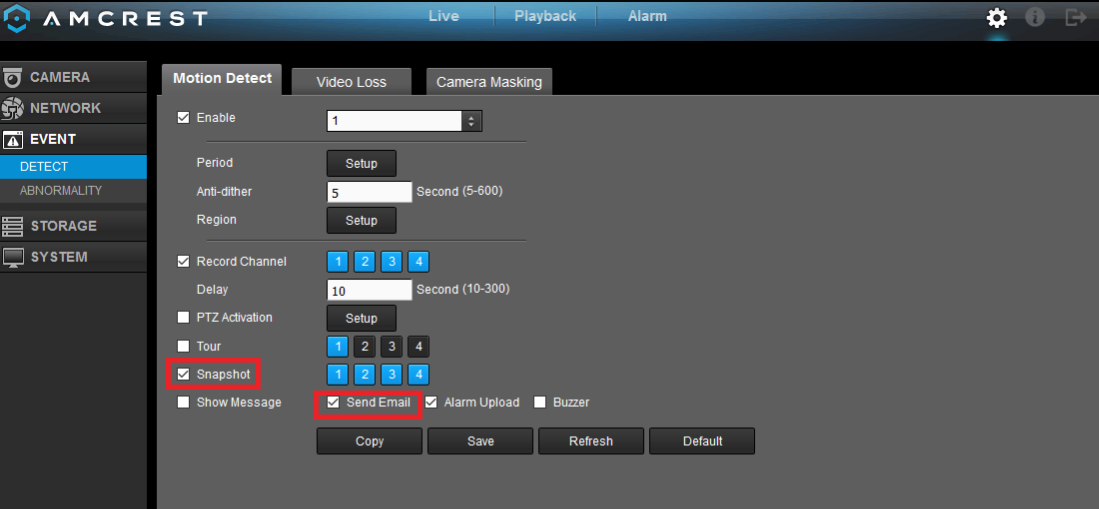
After the test email has been successfully sent, it is time to verify motion detection settings are properly set to send snapshots. To verify these settings, go back to the home screen and go to Settings>>Event>>Motion Detect.
In this motion detection tab, make sure the Enable checkbox is enabled to allow motion detection to come through. Next, verify the Send Email checkbox is checked, and the Snapshot checkbox is enabled as well. This allows the DVR to send snapshots of alerts as they are detected.
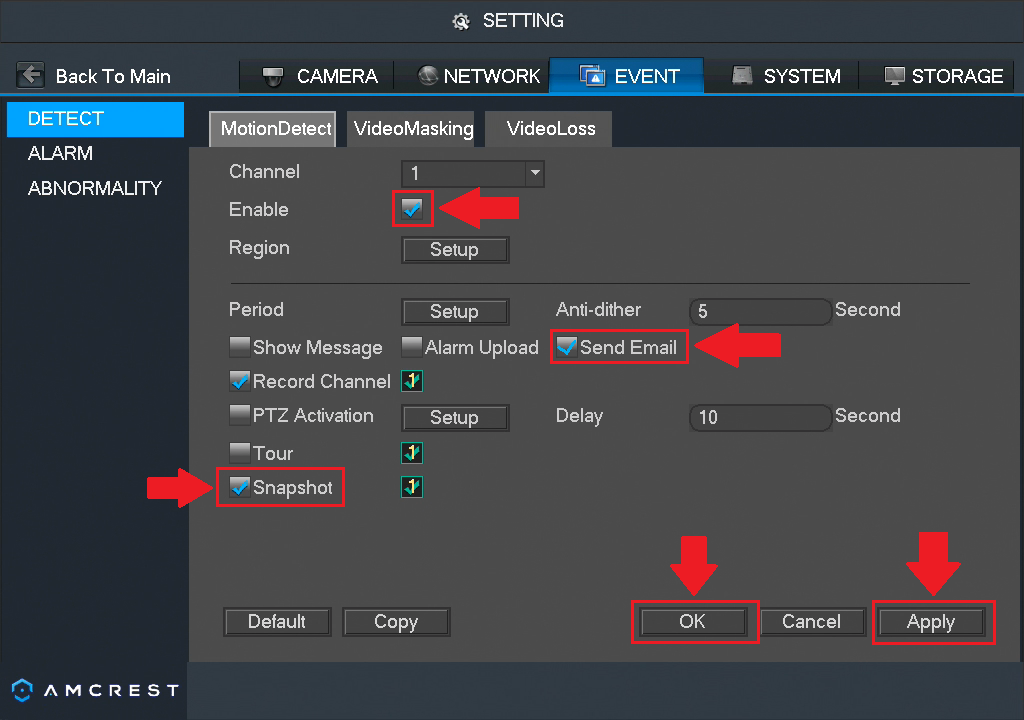
Once the snapshot settings for your email alerts have been set, click on Apply and OK to apply the motion detection snapshot settings to your device.
Verifying Motion Detection Schedules
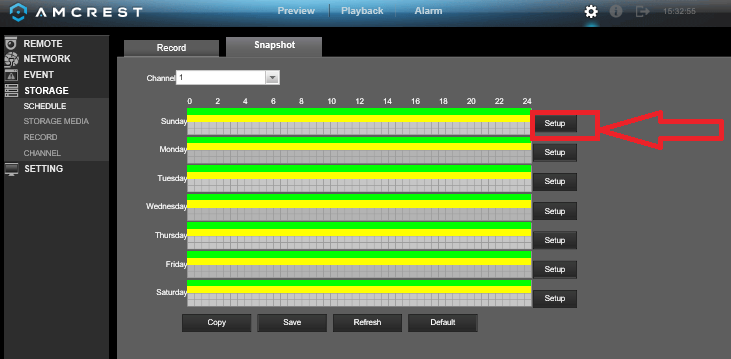
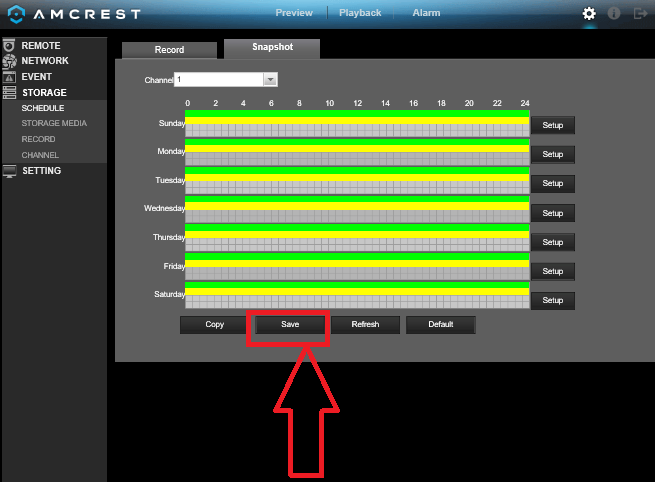
It is equally important to also verify that the motion detection schedules are set properly. This will help to avoid issues and confirm motion detection is properly set up in your device. To verify motion detection schedules are enabled properly, navigate to the home page and go to Settings>>Storage>>Schedule>>Snapshot.
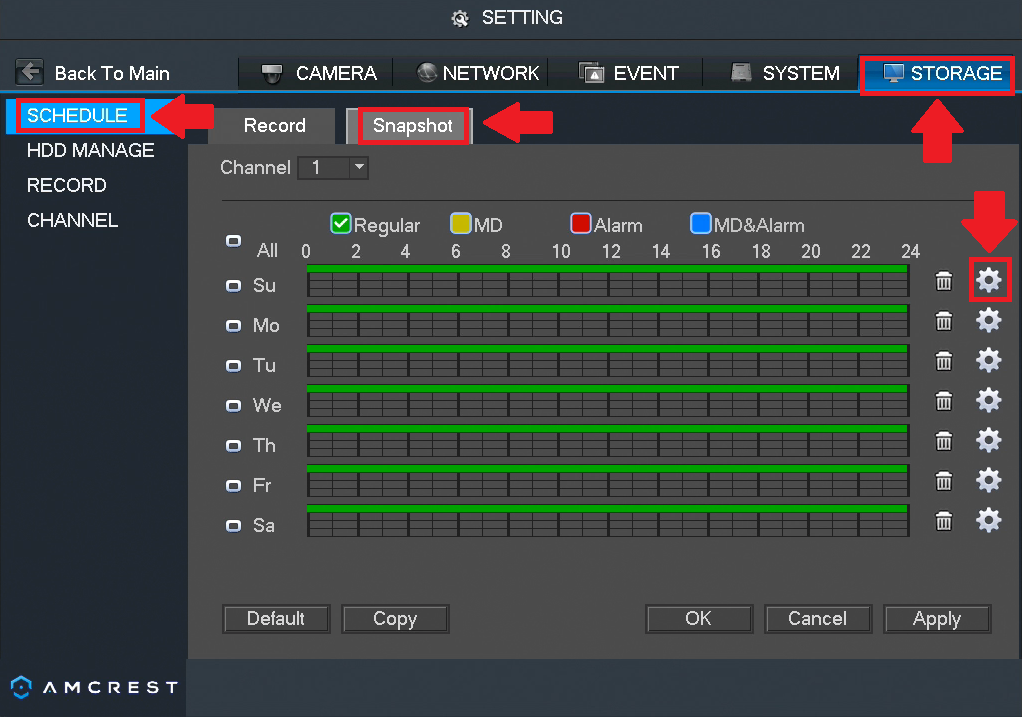
In the snapshot tab, you will notice a color-coded area. This indicates what type of schedule is being applied. For instance, Regular (Green) indicates continuous, 24/7 recording, MD (Yellow) stands for motion detection, Alarm (Red) shows any alarm schedules, and MD&Alarm (Blue) indicates both a mix of motion detection and alarm schedules are being applied. Click on the ![]() icon.
icon.

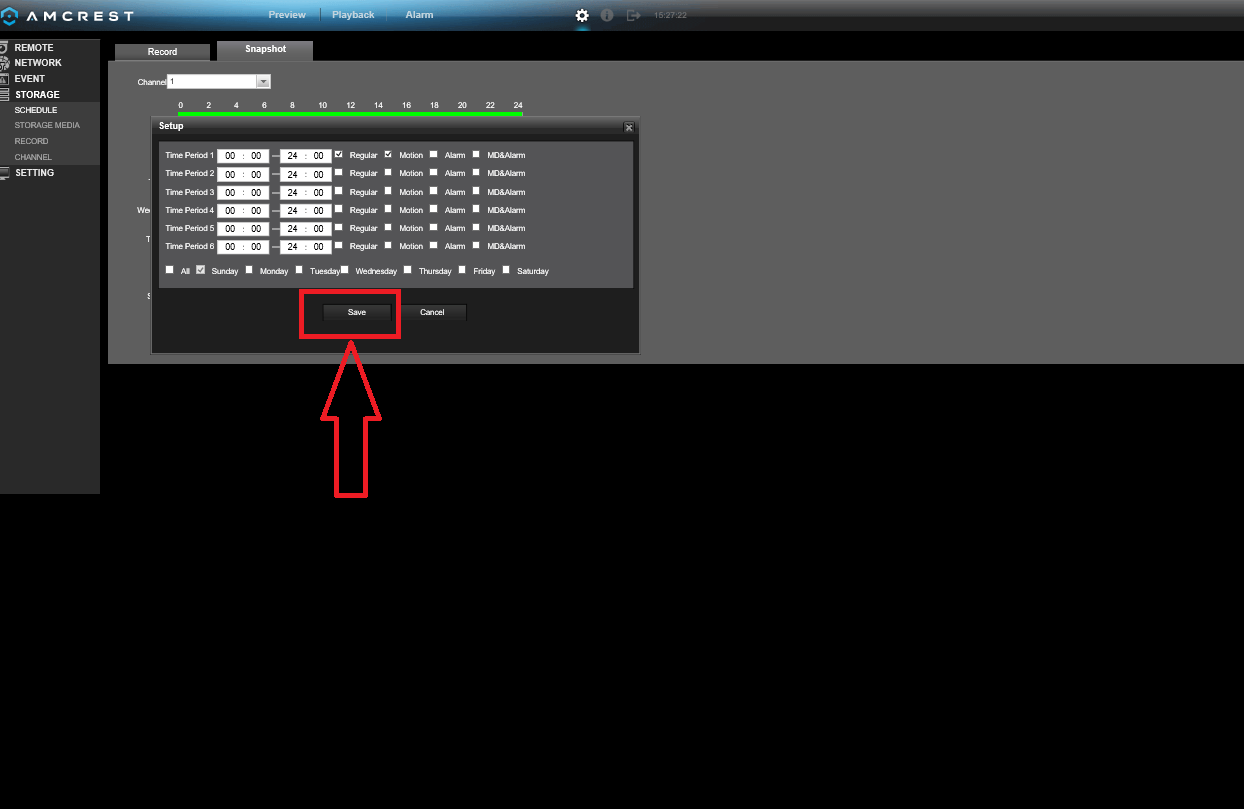
In the Period menu, you can schedule up to six periods, ranging from 00:00 - 24:00. Apply which schedule you would like into which periods (you can only do one if you want) and click on MD to apply the period to motion detection. In the Copy field, click on which days you would like to apply the schedule. If you would like all days, click on All. Click OK when you are done.
The schedule will now show MD (Yellow) indicating motion detection is set. Click on Apply and Save to apply the scheduled motion snapshot schedule.
Email alerts, motion detection, and snapshots are not properly enabled on your system and ready for use!
Setting Up Email Alerts Using the Web User Interface
If you do not have direct access to your system or would like to set up email alerts using a web browser, you can do so using the web user interface (web UI) for your device. For more information on how to access the web UI click here.
The web UI setup method for email alerts will be the same process as listed in the direct connection setup method. To set email alerts in the web UI, follow the information provided below.
Step 1: Log in to the web UI for your device and click on the Settings (![]() ) icon and navigate to Network>>Email. In the Email tab, click on Enable and enter the SMTP Server information.
) icon and navigate to Network>>Email. In the Email tab, click on Enable and enter the SMTP Server information.
Step 2: Enter the port number, the username (email), and the password for your email. Enter the sender email, select the encryption type (TLS (port 587), SSL (port 465) and enter a subject line for the alert. Enter the receiver email(s) and click on the (  ) icon to add it into the receiver field.
When complete, click on Save to save the settings. It is highly recommended to test the email connection before proceeding. Click on the Email Test button to verify connectivity.
Step 3: Navigate to Setup>>Event Detect>Motion Detect tab and enable the Snapshot and Send Email options and click Save.
Step 4: Verify the snapshot schedule by navigating to Setup>>Storage>>Schedule>>Snapshot and click on Setup
Step 5: Set the periods you would like used for motion detection and click on the Motion checkbox. Apply which days of the week you would like to use for your set periods. If you would like to use all days, click on All Click on Save to save your settings.
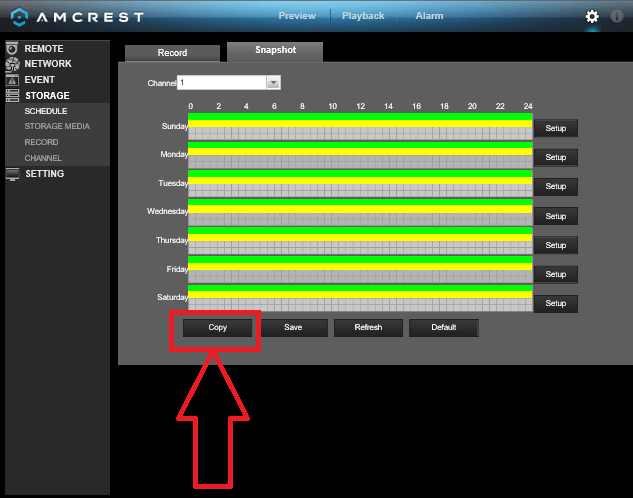
Step 6: Apply the settings to all cameras simultaneously by clicking on the Copy button.
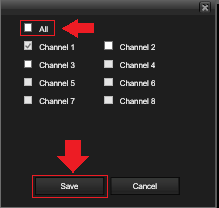
Select All to copy all channels connected to your device to the motion detection schedule.
Step 7: Click Save to save all settings to your system.
Email alerts and snapshots are now enabled for your device!
Comments
Please sign in to leave a comment.