Face Detection is used to detect face events and receive facial image snapshots. For more information on how to set up Face Detection on your camera, please refer to the information provided below.
Step 1:Log in to the web user interface (web UI) for your camera. For more information on how to access the web UI for your camera click here.
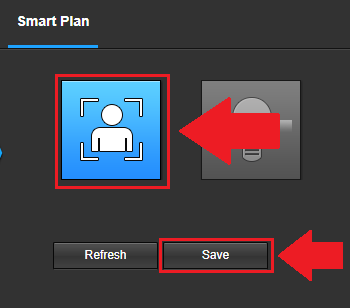
Step 2: In the web UI, click on Setup>>Event>>Smart Plan. Click on the Face Detection icon and click Save.
Step 3: Click on the Face Detection option located in the Events menu and select Enable.
Step 4: Click Record to allow the camera to begin recording face detection events (if a microSD card is inserted).
Note: To increase the efficiency of the image, click on the Enable Face Exposure checkbox. This helps to automatically increase or decrease the exposure of the image once a face is detected.
Step 5:This is not necessary however, to exclude a specific area on the interface from being able to detect faces, click on the Exclude Region button then draw the excluded area on the interface. Click Save to save the settings to your camera.
This device has the option that allows the white light LED to flash once an event has been detected. This is useful as an active deterrent. To enable this feature, click the White Light option and adjust the flicker frequency if needed. Click Save to save all settings to the device.
Email snapshots of the event can also be sent if email snapshots are set up on your camera. For more information on how to set up email snapshots, click here.
Comments
Please sign in to leave a comment.